A Rubik's cube in WebAR
Introduction
Augmented Reality or AR can simply be defined as the integration of a live video stream with some computer generated graphics. One example, that could come into mind is the microsoft hololens demo. The concept behind it is to take a picture and render some 3D or 2D graphics on to it.
In the current mobile browser like Google Chrome and Mozilla Firefox, we can render graphics and animation on the screen using a HTML5 canvas, and also develop games that are not based on Flash and do not require any additional plugins. This can be done using a framework/API known as WebGL(Web Graphics Library), which is based on the OpenGL ES 2.0. In this tutorial, we will be using some amazing javascript libraries that in-turn use this WebGL API, to create a rubik’s cube in Augmented Reality on the mobile browser.
Prerequisites
For this tutorial, you would need to have some background knowledge on how to write programs in HTML, CSS, and Javascript. In addition to that, it is recommended to learn on how to use the following libraries :
-
Three.js : Three.js is a library that makes WebGL easy to use. It comes with a lot of features similar to any 3D graphics application(for example Blender, Maya, 3Ds Max) like Lights, Cameras, Textures, Materials, Geometries, etc. A good starting point to learn about this library is here.
-
Awe.js : A small library that allows us to create Augmented Reality applications quickly and easily. With this library, we can do Marker-based AR and Location-Based AR applications. Check out this link for the tutorial on how to use this library.
Other than the tutorials, you would need few other things to get started :
- Clone/Download the Awe.js project to your local computer using the following command :
git clone https://github.com/buildar/awe.js.git
This is the base project that we will be editing and adding code to.
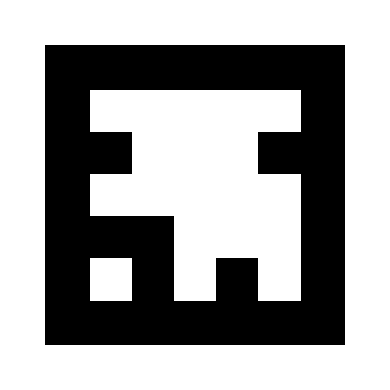
- I have modified the base version of the awe.js file, so that we can add different colors for each face of the cube. Download this file from this link, and save it to the
jsdirectory.
For this tutorial, the application that we will be developing is a marker based AR application. So, we will solely be focusing on the examples/marker_ar directory.
Base Code
Before we start, here is an idea on how the base project works. When you open examples/marker_ar/index.html in the browser (assuming a http server is setup and files are served locally) of your mobile device, it will open your device’s camera and display live video stream. When we focus the camera on a marker(in this case, the examples/marker_ar/64.png), it will render a cube with a texture on it. It would look something like this :
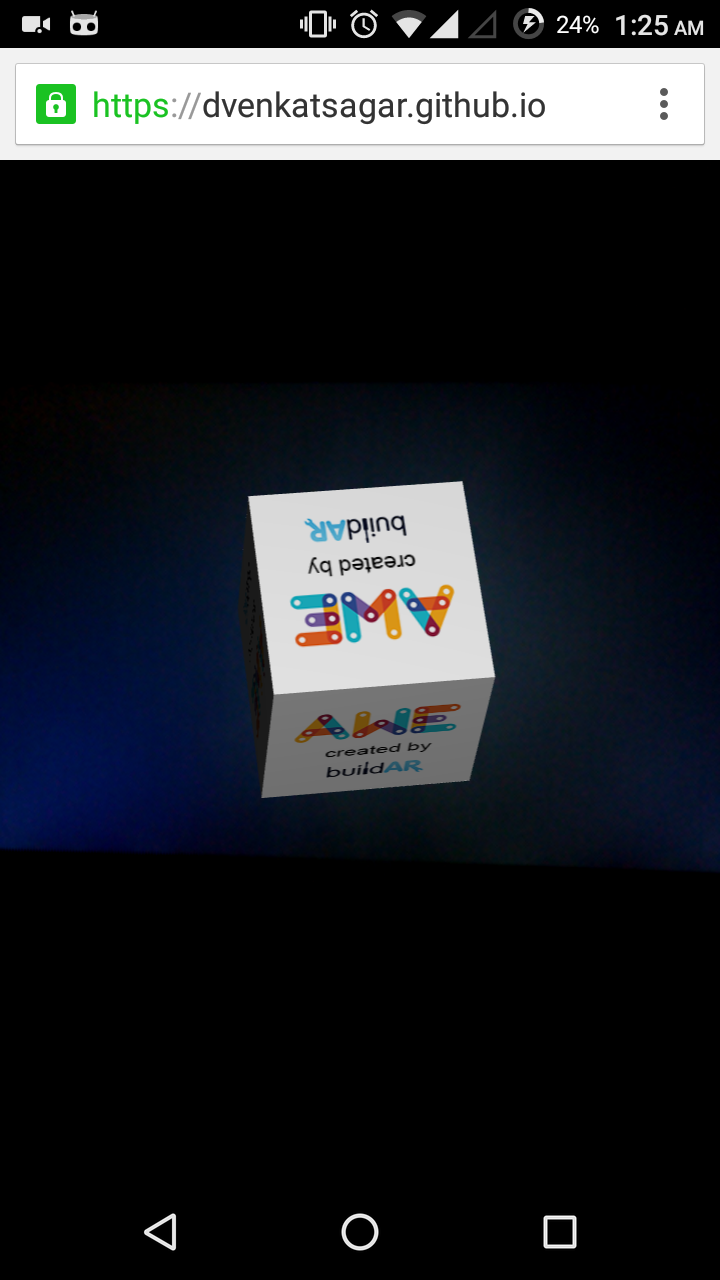
Screenshot taken from Chrome browser on a Moto G 2nd gen
The working of this code (in index.html) is as follows:
- Awe.js is initialized with the default settings.
...

window.addEventListener('load', function() {         // When the page loads
  window.awe.init({                                  // Initialize Awe.js
    device_type: awe.AUTO_DETECT_DEVICE_TYPE,        // Detect Device type
    settings: {                                      // Default settings
      container_id: 'container',
      default_camera_position: { x:0, y:0, z:0 },
      default_lights:[
        {
          id: 'point_light',
          type: 'point',
          color: 0xFFFFFF,
        },
      ],
    },

...
- After it is initialized completely, various dependencies are loaded.
...

ready: function() {                                  // After initialized and ready
  awe.util.require([                                 // Load dependecies and capabilities
    {
      capabilities: ['gum','webgl'],
      files: [
        [ '../../js/awe-standard-dependencies.js', '../../js/awe-standard.js'],
        'awe-jsartoolkit-dependencies.js',
        'awe.marker_ar.js',
      ],

...
- Upon loading the dependencies, a Three.js scene is setup using Awe.js API.
...

success: function() {                                 // After successfully loading the dependecies
  awe.setup_scene();                                  // setup the basic three.js scene

...
- A point of interest (poi) and a cube with a texture is added to the scene.
...

awe.pois.add({ id:'poi_1', position: { x:0, y:0, z:10000 }, visible: false }); // Add a point of interest
awe.projections.add({                                                          // Add a projection, i.e the cube
  id:'projection_1',
  geometry: { shape: 'cube', x:120, y:120, z:120 },
  material:{ type: 'phong', color: 0xFFFFFF },
  texture: { path: 'awe_by_buildAR.png' },
}, { poi_id: 'poi_1' });                                                       // link the projection with the poi

...
- Marker tracking is handled using the point of interest (the cube is projected according to the poi’s position, orientation based on the marker).
...

awe.events.add([{                                     // Add an event handler
  id: 'ar_tracking_marker',
  device_types: {                                     // target the devices that are available
    pc: 1,
    android: 1
  },
  register: function(handler) {                       // Handle the event only when the marker is visible
    window.addEventListener('ar_tracking_marker', handler, false);
  },
  unregister: function(handler) {
    window.removeEventListener('ar_tracking_marker', handler, false);
  },
  handler: function(event) {                          // main functionality for the event handler
    if (event.detail) {
      if (event.detail['64']) {                       // pre-defined set of markers, we are using marker 64
        awe.pois.update({                             // Update the position of the poi only when the marker is visible
          data: {
            visible: true,
            position: { x:0, y:0, z:0 },
            matrix: event.detail['64'].transform
          },
          where: {
            id: 'poi_1'
          }
        });
      }
      else {                                          // else hide the projection
        awe.pois.update({
          data: {
            visible: false
          },
          where: {
            id: 'poi_1'
          }
        });
      }

...
- Scene is rendered.
The Concept
The concept to render the rubik’s cube is like this:
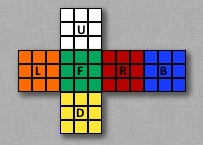
- The colors of each
cubit(An individual cube in the rubik’s cube) are defined. - 27 small cubits are added to the scene in the same way as given in the base code using a loop.
- All the cubits have the a single point of interest in common.
- The colors are then mapped to the cubits using a
MeshFaceMaterial.
The Program
<!DOCTYPE html>
<html>
<head>
<title>AWE Marker AR demo</title>
<meta name="viewport" content="width=device-width, minimum-scale=1.0, maximum-scale=1.0" />
<meta charset="utf-8"/>
<style type="text/css">
* {
	margin: 0;
	padding: 0;
}
#container {
	position: absolute;
	left: 0;
	top: 0;
	bottom: 0;
	right: 0;
	overflow: hidden;
}
</style>
</head>
<body>
<div id="container"></div>
<script type="text/javascript" src="../../js/awe-loader-min.js"></script>
<script type="text/javascript">
  window.addEventListener('load', function() {
    window.awe.init({
      device_type: awe.AUTO_DETECT_DEVICE_TYPE,
      settings: {
      	container_id: 'container',
        default_camera_position: { x:0, y:0, z:0 },
        default_lights:[
          {
            id: 'point_light',
            type: 'point',
            color: 0xFFFFFF,
          },
        ],
      },
      ready: function() {
        awe.util.require([
          {
            capabilities: ['gum','webgl'],
            files: [
              // Custom awe.js standard is used instead of the default one
              ['../../js/awe-standard-dependencies.js', '../../js/awe-standard-custom.js'],
              'awe-jsartoolkit-dependencies.js','awe-marker_ar.js'
            ],
            success: function() {
              awe.setup_scene();
              awe.pois.add({ id:'poi_0', position: { x:0, y:0, z:10000 }, visible: false });
              /*
                Step 1 : Colors for the cube faces are defined,
                Order to add color materials: x+,x-,y+,y-,z+,z-,
                Colors are in hexadecimal #ffffff
              */
              var colors = {
                //corners
                cubit_0 : [0xeeeeee,0xffa500,0xeeeeee,0xffff00,0xeeeeee,0x0000ff],
                cubit_2 : [0xff0000,0xeeeeee,0xeeeeee,0xffff00,0xeeeeee,0x0000ff],
                cubit_6 : [0xeeeeee,0xffa500,0xffffff,0xeeeeee,0xeeeeee,0x0000ff],
                cubit_8 : [0xff0000,0xeeeeee,0xffffff,0xeeeeee,0xeeeeee,0x0000ff],
                cubit_18 : [0xeeeeee,0xffa500,0xeeeeee,0xffff00,0x00ff00,0xeeeeee],
                cubit_20 : [0xff0000,0xeeeeee,0xeeeeee,0xffff00,0x00ff00,0xeeeeee],
                cubit_24 : [0xeeeeee,0xffa500,0xffffff,0xeeeeee,0x00ff00,0xeeeeee],
                cubit_26 : [0xff0000,0xeeeeee,0xffffff,0xeeeeee,0x00ff00,0xeeeeee],

                //mid-edges
                cubit_1 : [0xeeeeee,0xeeeeee,0xeeeeee,0xffff00,0xeeeeee,0x0000ff],
                cubit_3 : [0xeeeeee,0xffa500,0xeeeeee,0xeeeeee,0xeeeeee,0x0000ff],
                cubit_5 : [0xff0000,0xeeeeee,0xeeeeee,0xeeeeee,0xeeeeee,0x0000ff],
                cubit_7 : [0xeeeeee,0xeeeeee,0xffffff,0xeeeeee,0xeeeeee,0x0000ff],
                cubit_9 : [0xeeeeee,0xffa500,0xeeeeee,0xffff00,0xeeeeee,0xeeeeee],
                cubit_11 : [0xff0000,0xeeeeee,0xeeeeee,0xffff00,0xeeeeee,0xeeeeee],
                cubit_15 : [0xeeeeee,0xffa500,0xffffff,0xeeeeee,0xeeeeee,0xeeeeee],
                cubit_17 : [0xff0000,0xeeeeee,0xffffff,0xeeeeee,0xeeeeee,0xeeeeee],
                cubit_19 : [0xeeeeee,0xeeeeee,0xeeeeee,0xffff00,0x00ff00,0xeeeeee],
                cubit_21 : [0xeeeeee,0xffa500,0xeeeeee,0xeeeeee,0x00ff00,0xeeeeee],
                cubit_23 : [0xff0000,0xeeeeee,0xeeeeee,0xeeeeee,0x00ff00,0xeeeeee],
                cubit_25 : [0xeeeeee,0xeeeeee,0xffffff,0xeeeeee,0x00ff00,0xeeeeee],

                //mid-points
                cubit_4 : [0xeeeeee,0xeeeeee,0xeeeeee,0xeeeeee,0xeeeeee,0x0000ff],
                cubit_10 : [0xeeeeee,0xeeeeee,0xeeeeee,0xffff00,0xeeeeee,0xeeeeee],
                cubit_12 : [0xeeeeee,0xffa500,0xeeeeee,0xeeeeee,0xeeeeee,0xeeeeee],
                cubit_14 : [0xff0000,0xeeeeee,0xeeeeee,0xeeeeee,0xeeeeee,0xeeeeee],
                cubit_16 : [0xeeeeee,0xeeeeee,0xffffff,0xeeeeee,0xeeeeee,0xeeeeee],
                cubit_22 : [0xeeeeee,0xeeeeee,0xeeeeee,0xeeeeee,0x00ff00,0xeeeeee],

                //core
                cubit_13 : [0xeeeeee,0xeeeeee,0xeeeeee,0xeeeeee,0xeeeeee,0xeeeeee]
              };

              // Materials are created according to the colors
              var materialArrays = {};
              var materials = {};
              for (var i=0; i < 27; i++){
                materialArrays['cubit_'+i] = [];
                materials['cubit_'+i] = null;
                for (var j=0; j < 6;j++){
                  // Materials for the face of a cubit is created
                  awe.materials.add({id:'cubit_'+i+'_face_'+j,type: 'phong', color: colors['cubit_'+i][j]});
                  // These Materials are stored in an array
                  materialArrays['cubit_'+i].push(awe.materials.view('cubit_'+i+'_face_'+j));
                  // A new material for the cubit is created using the individual face materials
                  materials['cubit_'+i] = new THREE.MeshFaceMaterial(materialArrays['cubit_'+i]);
                }
              }

              // Step 2,3 and 4 : Cubits are added to the scene and colors are mapped in the process
              var cubeIndex = 0;
              // Positions are defined for each cubit in the for loop
              for (var k = -1; k <= 1; k++){
                for (var j = -1; j <= 1; j++){
                  for(var i = -1; i <= 1; i++){
                    // method to add one cubit
                    awe.projections.add({
                      id:'cubit_'+cubeIndex,
                      geometry: { shape: 'cube', x:20, y:20, z:20 },
                      position: { x:i*25, y: (j*25)+25, z:k*25 }, // To make the rubiks cube come above the plane/surface
                      material: { type: 'custom', custom: materials['cubit_'+cubeIndex] }
                    }, { poi_id: 'poi_0'}); // Every cubit has a common point of interest
                    cubeIndex++;
                  }
                }
              }

              awe.events.add([{
                id: 'ar_tracking_marker',
                device_types: {
                  pc: 1,
                  android: 1
                },
                register: function(handler) {
                  window.addEventListener('ar_tracking_marker', handler, false);
                },
                unregister: function(handler) {
                  window.removeEventListener('ar_tracking_marker', handler, false);
                },
                handler: function(event) {
                  if (event.detail) {
                    if (event.detail['64']) { // we are mapping marker #64 to this projection
                      awe.pois.update({
                        data: {
                          visible: true,
                          position: { x:0, y:0, z:0 },
                          matrix: event.detail['64'].transform
                        },
                        where: {
                          id: 'poi_0'
                        }
                      });
                    }
                    else {
                      awe.pois.update({
                        data: {
                          visible: false
                        },
                        where: {
                          id: 'poi_0'
                        }
                      });
                    }
                    awe.scene_needs_rendering = 1;
                  }
                }
              }])
            },
          },
          {
            capabilities: [],
            success: function() {
              document.body.innerHTML = '<p>Try this demo in the latest version of '+
              'Chrome or Firefox on a PC or Android device</p>';
            },
          },
        ]);
      }
    });
  });
  </script>
</script>()
</body>
</html>
The result that you are going to see when you open the webpage in the browser is going to be something like this:
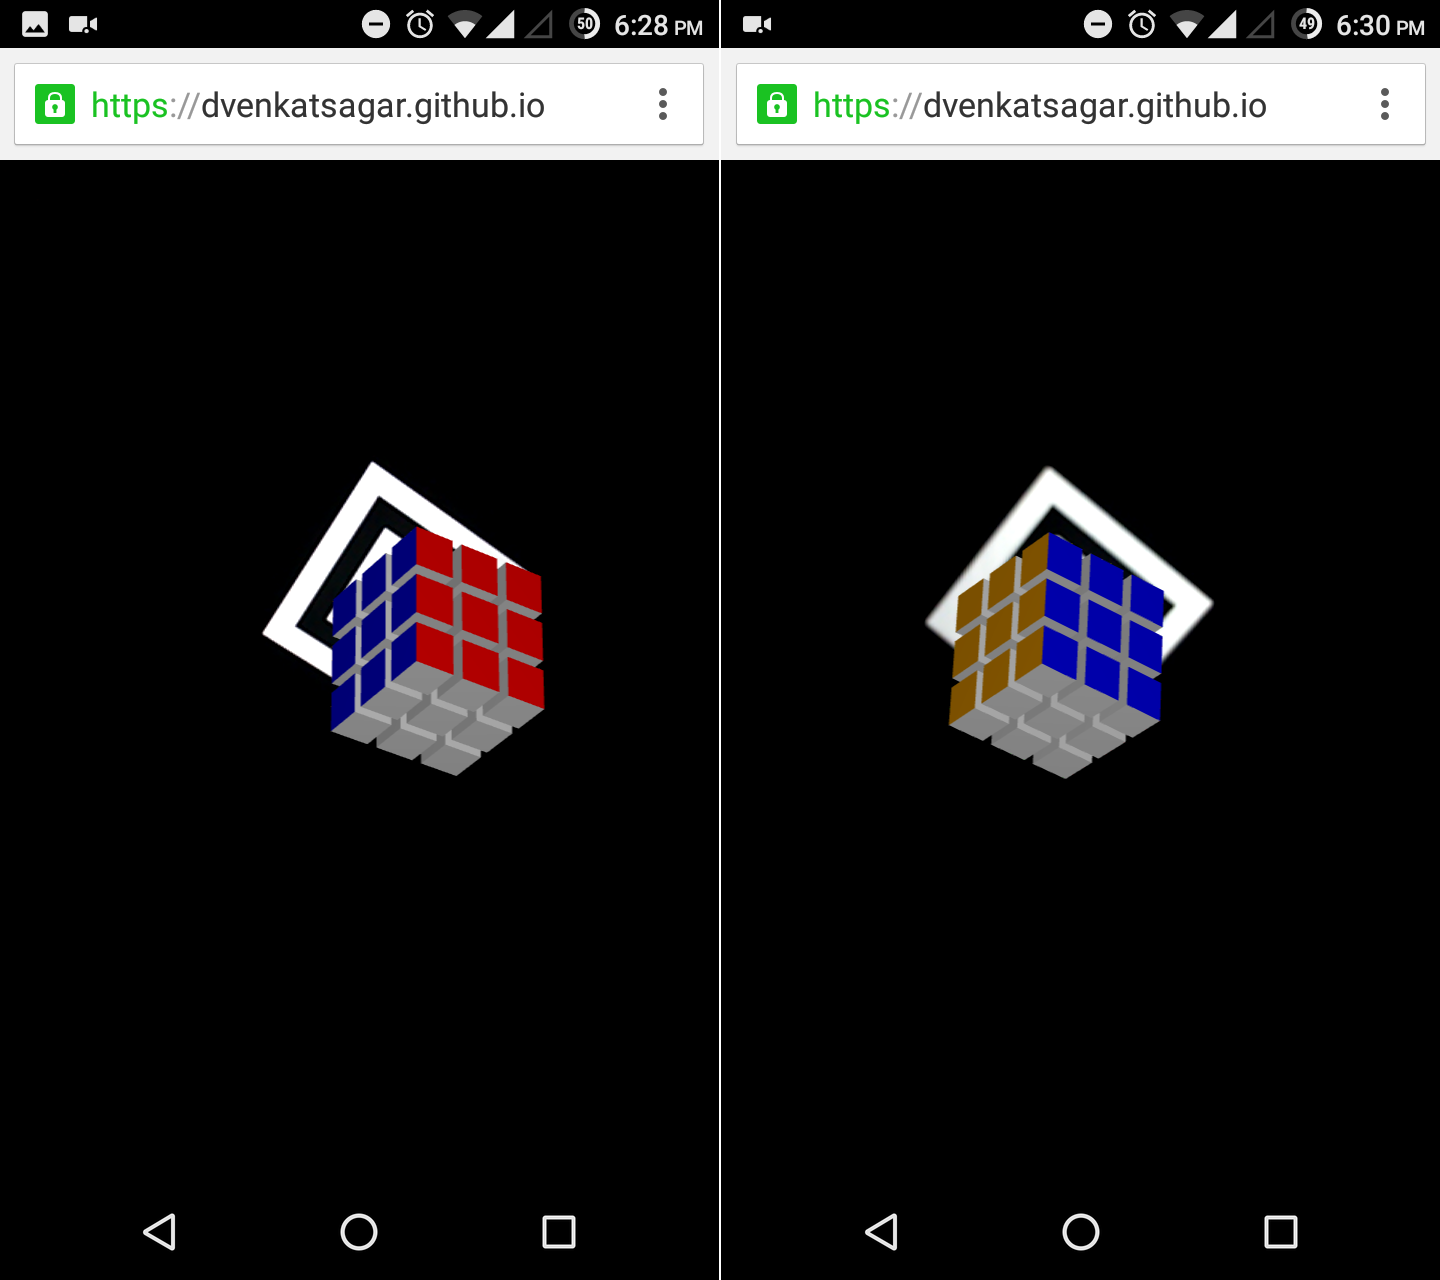
Screenshots taken from Chrome browser on a Moto G 2nd gen
Conclusion
So we basically created a rubiks cube model in AR on the Mobile Browser. The results can vary from device to device, and it also depends on how much processing power your device has. For example, A nexus phone would render the page faster and better then the Moto g 2nd gen. I hope you guys have learned something in this tutorial and have fun experimenting with this. Links to the project are given below, please do check it out. I will be uploading another tutorial on how to animate the cube and give controls to the user to play with it in the near future.
Update 1 : To my understanding, the awe.js seemed to be dead and was not under active development, but now they restarted the project and hopefully we see some new features. So I’ll be doing a new tutorial on the rubik’s cube creation and game design depending how active the library is developed. Please stay tuned and thank you.
Resources
- Three.js : http://www.threejs.org
- Awe.js : https://buildar.com/awe/tutorials/intro_to_awe.js/index.html
- Rubiks cube color scheme : http://ruwix.com/pics/western-color-scheme-rubiks-cube.jpg
- Project page : https://gitlab.com/dvenkatsagar/rubikAR
- Working example : https://dvenkatsagar.github.io/proj/rubikAR/
- Marker Image : https://dvenkatsagar.github.io/proj/rubikAR/64.png
I feedback.
Let me know what you think of this article on twitter @dvenkatsagar or leave a comment below!